Deprecated: Function get_magic_quotes_gpc() is deprecated in /home/perryhoodproperties/public_html/blog/wp-includes/load.php on line 651

Notice: Trying to access array offset on value of type bool in /home/perryhoodproperties/public_html/blog/wp-includes/theme.php on line 2241

Deprecated: Function get_magic_quotes_gpc() is deprecated in /home/perryhoodproperties/public_html/blog/wp-includes/formatting.php on line 4387
November 2019 - Perry Hood Properties, Inc.
Deprecated: Function get_magic_quotes_gpc() is deprecated in /home/perryhoodproperties/public_html/blog/wp-includes/formatting.php on line 4387

Deprecated: Function get_magic_quotes_gpc() is deprecated in /home/perryhoodproperties/public_html/blog/wp-includes/formatting.php on line 4387

Deprecated: Function get_magic_quotes_gpc() is deprecated in /home/perryhoodproperties/public_html/blog/wp-includes/formatting.php on line 4387

Deprecated: Function get_magic_quotes_gpc() is deprecated in /home/perryhoodproperties/public_html/blog/wp-includes/formatting.php on line 4387

Deprecated: Function get_magic_quotes_gpc() is deprecated in /home/perryhoodproperties/public_html/blog/wp-includes/formatting.php on line 4387

Deprecated: Function get_magic_quotes_gpc() is deprecated in /home/perryhoodproperties/public_html/blog/wp-includes/formatting.php on line 4387

Deprecated: Function get_magic_quotes_gpc() is deprecated in /home/perryhoodproperties/public_html/blog/wp-includes/formatting.php on line 4387

Deprecated: Function get_magic_quotes_gpc() is deprecated in /home/perryhoodproperties/public_html/blog/wp-includes/formatting.php on line 4387

Deprecated: Function get_magic_quotes_gpc() is deprecated in /home/perryhoodproperties/public_html/blog/wp-includes/formatting.php on line 4387

Deprecated: Function get_magic_quotes_gpc() is deprecated in /home/perryhoodproperties/public_html/blog/wp-includes/formatting.php on line 4387

Deprecated: Function get_magic_quotes_gpc() is deprecated in /home/perryhoodproperties/public_html/blog/wp-includes/formatting.php on line 4387

How to Mount a TV on a Wall

(4-min read)
Disclaimer: Every flatscreen TV and mount will be different. Please consult the specific instructions for your mount and TV models before installing them. This article is meant to give you a rough idea of what actions are involved.

Either your toddler can now reach your flatscreen, or you’re thinking of ditching the entertainment center, it’s time to mount your flatscreen TV on the wall. Fortunately, incredibly light televisions and an array of wall-mount brackets make this a breeze. There are, however, right ways and wrong ways to go about getting your flatscreen to be mounted correctly on your living room, bedroom, or kitchen wall.

Tools Needed

  • TV
  • Wall mount with necessary hardware
  • Power drill
  • Pilot-hole-sized drill bit
  • Screw driver bit
  • Bubble or electronic level
  • Tape measure
  • Pencil
  • Some washers
  • Stud finder
  • Terrible dad joke about the stud finder

Picking a Quality TV Mount

Before you begin, you’re obviously going to need a TV mount frame. Most flatscreens do not come with one and there are thousands on the market. It’s important not to simply pick up the least expensive mount as you want one that will support the full weight of your TV and then some. Make sure that it fits the dimensions of your TV, can handle the weight and allows for the amount of movement that you desire. Do your research because an improper mount won’t only potentially damage your wall or your TV, but it may harm you or a loved one if your TV can’t support it.

Selecting the Right Location

You likely already know where you want to mount your TV, but there are an array of factors to consider. Firstly, keep in mind that the TV should ideally be at eye-level when sitting in the preferred viewing spots in the room. Mounting your TV higher or lower will require one to tilt their head up or down for long periods, which can lead to neck strain.

Using a TV wire kit, it is possible to hide connecting wires. However, some homeowners opt for running TV wires through the actual wall using a variety of cuts in the wall and snaking them through. This streamlined look provides the illusion of a floating TV (cue “oohs” and “ahhs” from audience). How to do that is a subject for another article.

Find the Studs (Insert Dad Joke Here)

Even though drywall can hold much smaller televisions, you’re better off not risking such foolishness. After finding the stud with the stud finder, mark its location gently on the wall using the pencil. Many studs in homes are about 16” apart, so you can likely find nearby studs within that vicinity. Mark nearby studs as well once located.

Use the TV Mount as Your Guide

Once you have located the studs in the area where you would like to mount the television, hold the TV stand where you’d like to place it with the mounting holes lining up with the stud markings. When you have the TV mount roughly where you’d like it, mark the holes with a pencil along the stud markings.

Drill Your Level Pilot Holes

Set the TV mount down for a moment and create a pilot hole where one of the marked holes sits. Place the TV mount back up on the wall and run a screw into the pilot hole halfway — just enough to hold up the weight of the TV mount if you were to let go of the other side. Holding the TV mount up, place the level on top of the TV mount. Once level and in line with a wall stud, mark it with a pencil. Let the TV mount hang while you drill the second pilot hole. Once the pilot hole is drilled, you can begin screwing both mounting screws that came with the TV wall mount — periodically rechecking the mount with the level as you tighten the screws. If tightening one side over another causes the TV mount to become unlevel, you may need to use the washers to level it out. Once mounted, lightly test the mounting bracket by applying as much pressure on the mount as your TV would exert on it.

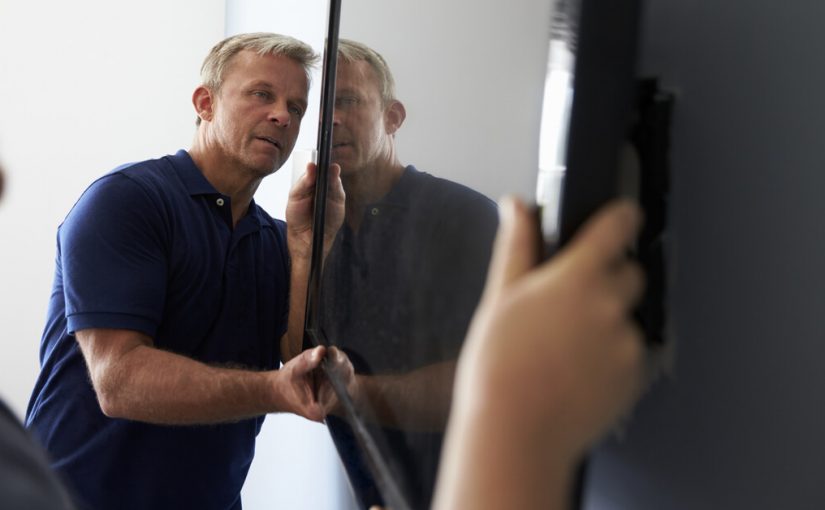
Install the TV on the Mount

Have a friend hold your TV up to the mount while you check the TV to make sure it is level on the mount. Run the proper screws through the backside of the screen and secure it. Before releasing the TV to be held by the wall mount, please make sure that all screws are thoroughly tightened.

And there you have it — your very own wall-mounted TV. Stay tuned later for tutorials on how to hide your TV cables.


Learn more about building your dream home in Northeastern Oklahoma with help from Perry Hood Properties. 

5 Things to Do Following a House Flood

(3.5-min read)

No matter how prepared you feel you are, nothing quite prepares you to deal with a flooded home. Though you’d probably like to curl up in a ball, the circumstance likely needs further attention. Despite the situation seeming hopefulness, there are some actions you can take immediately following home flooding to keep your family safe from additional adversity and your home from further damage.

Preventing Electrical Hazards

Because you hopefully evacuated your home, if you’re returning to inspect the place and retrieve precious valuables, make sure that the power is completely cut off. When power circuits are exposed to water, this can make flooded walkaway immensely dangerous. Damaged electrical connections can also increase the risk of fire within a flooded space. 

Stay Safe with Protective Gear & Precautions

If you plan on re-entering your house following a flood, only do so if you’re taking the right protective precautions. Even if the waters in your home are fairly clean looking, there’s a chance that hazardous materials and microorganisms may have found their way into the waters within your home. Before entering your home to recover valuables, essential documents, and to document damage, make sure you are wearing adequate water protection in the form of rubber boots, waders, and gloves. If any of your food has come in contact with floodwaters, make sure to throw it out and boil all water from the tap before use until told otherwise by officials. If you need to leave the property, make sure to lock it up to protect it from looters. If there is any doubt about the safety of the property, seek shelter elsewhere.

Locate and Remove Essential Documents

Filing insurance claims, moving to a new location, or really just conducting your life without the proper paperwork is an uphill battle. Ideally, you should have your most essential household and legal documents (marriage licenses, birth certificates, deeds, titles, policy records, etc.) kept in a case that you can take with you in the event of an emergency such as flood or fire. If you didn’t have these documents before, try to safely locate and remove them once you return to the house.

Safely Document All the Damage You Can

Once your home has been deemed safe to enter once again (meaning the roof won’t collapse and the electricity has been disconnected), document all of the flood damage you can. If you’re using a camera, try to engage the date stamp feature on it for official purposes. If using video, feel free to make notes about all of the flood damage as you show it. Remember to make periodic updates as the damaged conditions worsen after floodwaters recede.

File the Appropriate Claims

If you have flood insurance, you must file claims with your insurance company as soon as possible. Some insurance companies may move slower than others, so the sooner you’ve submitted your claims, the faster you can start to repair, rebuild, or move to a new home. Working with an insurance professional may help answer any questions you have.


Bonus: Rebuild Again With Help from the Professionals

Nobody likes to lose their home. However, if your home has been lost to flooding and you’re contemplating rebuilding, look no further than the home construction professionals at Perry Hood Properties out of Northeastern Oklahoma. When you trust the home construction experts at Perry Hood Properties, you can finally feel at home again.

How Much Does Home Demolition Cost?

(4-min read)

So, you’ve found a great location to start to begin your new house construction project. There’s only one problem — there’s already a house there. After eyeballing it, you figure that you can rent a bulldozer and have the old house that sits on the property demolished. Then there’s the old foundation, the cleanup, the disposal, etc. Ok, maybe you’re starting to bite off more than you can chew. Fortunately, there are a variety of home demolition companies who would love to take a crack at your project — pardon the pun. But your real question stands: How much does home demolition cost? Well, there are various issues to consider that will affect the price.

The End Cost of “Well, I’ll Just Do It Myself.”

So, you’ve knocked down a few walls, or ripped out some kitchen cabinets in your day — how much harder would it be to demolish a house yourself? As it turns out, DIY home demolition may end up being even more expensive than merely letting an experienced professional handle it. Knowing the proper procedures, which tools and equipment to use for specific tasks, and the potentially back-breaking (sometimes literally) labor required to level and remove a home may be more than you bargained for — and that’s assuming there are no surprises. Throw in some hazardous materials, improperly capped utilities, and damaged neighboring properties, and you’re in for an extremely costly endeavor.

Foundational Preservation or Complete Demolition

Let’s say that you went out to examine the house that sits on the property where you would like to build. It still has plumbing running through the foundation and you could almost see yourself living with the layout, but the house that sits on it is beyond repair. Reusing an existing foundation isn’t unheard of and may save you quite a bit in demolition and construction costs. If you keep the foundation, you may save yourself the cost of crushing the concrete slab and having it carried away. If you have the entire home demolished, slab and all, that will have an impact on the total cost of demolition. Full disclosure, though — reusing home foundations isn’t all that common.

Demolishing and Disposing of Hazardous Material

Most demolished home debris can be hoisted into a dump truck and taken to a landfill without issue. If a home contains hazardous materials, however, this can make a simple demolition much more complicated. Disposing of materials such as lead paint and asbestos requires compliance with specific regulations. Handling, moving, and disposing of such materials may significantly impact the price of standard home demolition. For this reason, it’s crucial to have a location carefully inspected before demolition to save yourself from unwanted surprises.

Location, Location, Location

If a professional demolition company needs to knock down a house, the location of the house will also impact the price. If the home is located in a densely populated neighborhood, this can make demolition trickier than it would be for a home in a more expansive, rural location. Preserving the surrounding houses from damage, moving heavy equipment between the front and back yards, maneuvering dump trucks and dumpsters — all of these tasks are significantly more time-consuming in a neighborhood where houses are packed in like sardines. A home on a larger plot that allows for heavy equipment access on all sides may be reasonably straightforward for a demolition specialist.

Ok, Ok, How Much Does a Home Demolition Cost?

As of the publishing of this article, the typical cost of home demolition can run anywhere from $5,000 and $25,000. The magnitude, number of variables, and complexity of a project will change the price. Keep these numbers in mind before buying a property containing a house you intend to demolish to make way for a new home construction project.

Reasons to Consider Recessed Lighting for Your Home

(3-min read)

For those looking to spruce up a dull home interior, there are several great ways to breathe new life into an old design. Some opt for updated molding; others change out the flooring materials. While these are both great ideas, there is a relatively easy update that can add class and spaciousness to any room — recessed lighting.

Spacious Feel

High ceilings in a home feel quite inviting and luxurious. While this is the case, some homes simply can’t provide high ceilings in every space — especially on the upper floors where space is limited. Unlike protruding or hanging light fixtures, recessed lighting fixtures can make a ceiling feel higher than it is. This is due to a flush look that brings one’s attention to the actual height of the ceiling instead of a protruding light fixture. It’s not actually making the ceiling feel any higher, but it’s certainly not making it feel lower the way a hanging light fixture can.

Energy Efficient Light

For new home construction or remodeling an existing home, recessed lighting can also bring a space into the world of energy efficiency. The reason for this is the size of the light. Many recessed lighting fixtures aim to keep their fixtures shallow for the ease of installation. This shallowness demands the use of smaller lights. Smaller lights, especially of the LED variety, are exponentially more energy efficient than fluorescent and incandescent types. LED lights are also immensely more efficient in terms of heat generation, making them a safer alternative.

Upscale, Luxurious Look

Despite their ease of installation and relatively low cost, recessed lighting still maintains an upscale look. Part of this effect is the lack of a visible light fixture at all. Recessed lighting gives the impression that extra focus on detail was brought to the space and consideration given to the interior design. Another reason for their ambiance of luxury is because they were once not as common in most homes. Fortunately, classy recessed lighting can be yours, even if you’re on a reasonably tight budget.

Complete Light Coverage

Due to their hanging or protruding structure, traditional light fixtures are typically relegated to a central point in a room with the goal illuminating the entire space. Recessed lighting, on the other hand, doesn’t occupy any headspace, which allows for multiple ceiling fixtures to be installed within a single room. Having numerous lights means total room lighting covered without any dark corners.

Let Perry Hood Properties Help You Decide

Designing your dream home in Northeastern Oklahoma has never been easier than it is with help from Perry Hood Properties. Our home construction professionals can help you design and build a house you’ll be thrilled to call “home” for years to come.

Learn more about Perry Hood Homes today.


Deprecated: Function get_magic_quotes_gpc() is deprecated in /home/perryhoodproperties/public_html/blog/wp-includes/formatting.php on line 4387

Deprecated: Function get_magic_quotes_gpc() is deprecated in /home/perryhoodproperties/public_html/blog/wp-includes/formatting.php on line 4387

Deprecated: Function get_magic_quotes_gpc() is deprecated in /home/perryhoodproperties/public_html/blog/wp-includes/formatting.php on line 4387