How to Avoid Basement Water Damage & Staining

(3-min read)

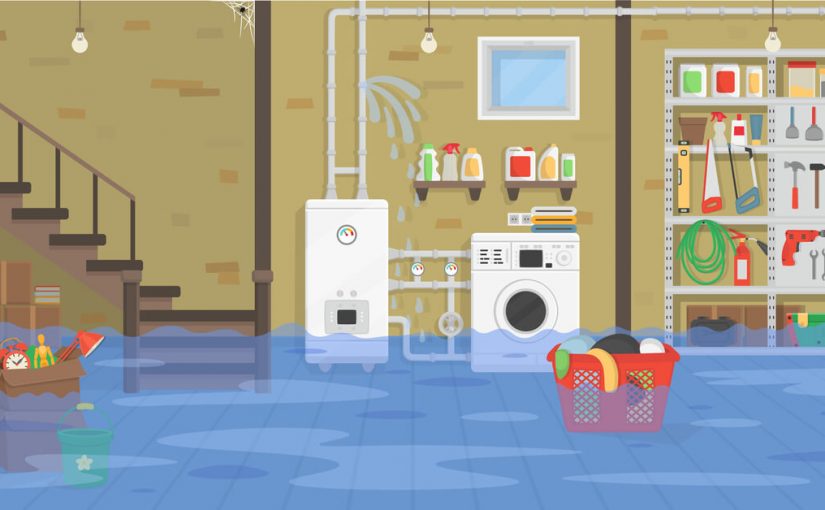
Even though basements aren’t as common in Oklahoma due to the rocky soil, there are some houses equipped with basements and storm shelters. Because many Oklahomans are unfamiliar with proper basement maintenance, one of the primary headaches of having a basement is water damage. Whether you have a basement or are looking at buying a home with a basement, here are some tips on preventing and avoiding basement water damage.

French Drains

Like french fries, french drains do not actually originate in France. These Massachusetts inventions are a series of perforated drain pipes buried a few feet under gravel-lined ditches that run along the foundation of your home. Angled down, the pipes catch residual water that would typically flow through the foundation of your basement. While there are various designs and applications depending on the style of the home, climate, and soil composition, the design is essentially the same. Water follows the path of least resistance, thus is more apt to flow through the gravel into the hole-filled drainpipes than to make its way into your basement.

Vapor Barriers

To keep moisture from seeping into your basement, cement is frequently too porous to do the job alone. Insulation can also be particularly gross and musty when wet. It’s for this reason that many recommend installing a vapor barrier between the wall insulation and the concrete foundation. A vapor barrier is a variety of sheets of water-resistant material designed to keep water from getting wall studs and insulation wet. For the excellent job vapor barriers do in keeping moisture out, they’re unfortunately also great at keeping moisture in. For this reason, it is recommended to leave a gap between the vapor barrier and the concrete wall to allow for the water to evaporate instead of being locked into the basement.

Waterproof Paint

While waterproof interior paint seems like an obvious solution to keep water out of your basement, it really should be treated more as a temporary fix. When applied, the paint will prevent a fair amount of water from entering the basement and will hide past water stains. The problem lies in the fact that the water has already made its way through the foundation and is only being kept back by a few layers of waterproof paint. It may hold for a while, but it will eventually fail and require and more permanent solution.

Sump Pumps

The most tried-and-true method of removing water from your basement is with a sump pump. Sump pumps are typically connected to drains located at the lowest points of the basement. After a heavy rain or just when the drain is filled with a certain amount of water, the pump kicks on to remove the gathered water before it has a chance to flood your basement. Sump pumps are highly recommended for those whose basements are located on higher water tables that make them more prone to flooding.


Have you always wanted a basement? The custom home construction professionals from Perry Hood Properties can help.

Learn more about the custom home construction professionals from Perry Hood Properties today.

5 Ways to Keep Emotions Out of the Homeshopping Process

(5-min read)

A friend of ours related a story from his childhood: 

“When I was about five or six years old, I remember coming home from school to find my mother in tears. While I wondered what the matter was, I didn’t even know how to ask. A few hours later, when my father came home, I asked him why Mom was so sad.’ 

‘We put in a bid for a house your mother loved and were outbid by someone else.’

I remembered that my mother was truly in love with the house in question. She remarked how ideal the house was for our family and how much she liked the neighborhood. I even recalled going with her for a walk as she met the neighbors. In her mind, this was becoming home. Around the time the details were coming together, her joys were dashed by being outbid. She had started to build our family’s life in this home in her mind and with a single telephone call, that future was taken away.” 

Such is a common story of letting your emotions mingle with your home buying experience. Let’s take a look at several other ways to keep what should be a transaction from becoming an emotional rollercoaster.

1. Don’t place wants over needs.

Even though this is good advice for any transaction, prioritizing an excellent option over a requirement is a recipe for confusion. If your family absolutely needs two full bathrooms, but you’d like a pool, know which option you’re willing to budge on and on which you will remain firm. Electing for a nice feature over what was once a required element is a guaranteed recipe for buyer’s remorse. 

2. The only thing you should be absolutely married to is your budget.

We’ve all seen the cable television shows where a person or couple are having to decide between several houses. At times, you may find yourselves rooting for them to go ten, twenty, or even thirty thousand dollars over their budget for that exclusive neighborhood, the back deck, or the pool. We need to remember that life is not a TV show and that an extra twenty or thirty thousand dollars isn’t going to magically materialize out of thin air. It will likely put a strain on them as it would on you. Letting your mind rationalize going over budget is not only not recommended, but may even put your family in financial jeopardy down the road. A good rule of thumb is to not even look at houses that are out of your price range. There’s really no reason to. 

3. Don’t choose realtors based on likeability.

We often forget that realtors are salespeople. Of course, they’re going to be nice and bend over backward for you. Still, like salespeople, some truly talented realtors know their stuff, and there are underhanded or just inexperienced folks with realtors’ licenses. When deciding on a realtor, don’t just pick the first one who rubs you the right way. Interview several as though you were hiring them to work for you…because you are. 

4. Respect and understand the seller’s emotional state.

There is an idea that we overvalue things we own just because they belong to us. This is true of tons of random junk in our garages, but it is also true of our homes. This emotion may cause a seller to overprice their home. When you approach them with an offer lower than their possibly-inflated asking price, be ready to justify your bid in a respectful manner. Keep in mind that this place has been their home. Their family has formed priceless memories here. Be mindful of this, but also realize that the value of these memories are non-transferrable into the value of the house. 

5. Don’t get emotionally attached to a home until you’ve moved in.

As we read in the story above, getting emotionally attached to a home can be a recipe for heartache. When house shopping, do your best to channel your inner Spock. Look at everything with logical and critical eyes. Take note of what will work for you, what would need to be changed and how much that would cost. If you allow yourself to emotionally put down roots in a home you do not yet own, it will be excruciating when you have to rip those roots out. 

Remember our friend from the beginning of the article? Well, this story has a happy ending. The family found their dream home in a fixer-upper elsewhere that they were able to transform into a home that saw all of the children into adulthood. This goes to show that there’s no need to get wrapped up in a specific location. There’s always another house waiting for you. 


Did you know that there’s a way to skip the nail-biting home shopping process? The custom home building professionals from Perry Hood Properties can help you customize your dream home from the ground up. 

Learn more about the custom home options available from Oklahoma’s own Perry Hood Properties. 

Building Your Own Personal Garage Gym

(5-min read)

Going to the gym can be a pain. You have to account for the time there as well as transportation back and forth. You have to use equipment you hope is sanitary — that is, if someone isn’t using it already. You have to entrust your valuables to a locker room. You may have to use substandard showers. Wouldn’t it be nice to have a gym of your own? Let’s take a look at what it takes to build your own home gym in your garage. 

Clear a space for a clear mind.

The first obstacle to building a garage gym is merely finding the space to create one. Begin by de-cluttering your existing garage space. There are probably items in that location that you don’t even need anymore. You’ll be surprised how much stuff you can get rid of when you don’t fall for the “I might use this one day” fantasy. If you haven’t in the last 10 months (excluding holiday decorations), you likely won’t. 

Start small to avoid a false-start. 

Getting started building your garage gym can be exciting and can quickly lead you on a shopping spree for this endeavor. Before you know it, you may end filling your garage gym up with so much stuff that you may not have space even to work out. Remember that this gym isn’t storage space for equipment, but instead a place where exercise is done. Start by doing workouts that don’t require any equipment. Consider marking the area with a rubber flooring, a large mat, or even just electrical tape. Once you’ve finally assigned this space as a place for exercise in your mind, slowly add equipment. Start maybe with a jump rope. Next, add some small hand weights. Perhaps transition into a heavy bag or a speed bag. Add items one at a time, only as you know you’ll use them.woman doing kettlebell push ups in garage gym

Extra tip: Get help finding exercises that don’t require equipment from the 7-Minute Workout App or Workouts by Darebee.  

Use the structure as equipment.

Having a sturdy-framed place designated for exercise is an excellent location for calisthenics. Consider installing a pull-up/chin-up bar or possibly some gymnastic rings. Being in a garage means you likely have easier access to load-bearing studs. Take advantage of them and install equipment that leverages your own body weight in exercise. 

Structure your equipment storage. 

A garage gym can quickly get cluttered if your equipment is not organized. Prepare the space in different zones depending on the exercises that each piece of equipment facilitates. Keep all weights stowed when not in use. Use hooks to hang up jump ropes, water bottles, towels, and other items that would generally take up space on the floor. Everything should have it’s space when not in use.


Is your garage not big enough for a gym? Perhaps its time for a home with a workout room. For help building your own personal workout space in your dream home, the friendly Oklahoma-based home-building professionals from Perry Hood Properties can help. 

Yes, I’d like to learn more about building my dream home from the ground up. 

“How Long Will My Roof Last?” Comparing Materials

(5-min read)

Whether you’re buying or building a new house, the roof is one of the more costly upgrades you can make for your home. Still, choosing the right material can mean a roof that will last for decades or one that may give you headaches in just a few years. Let’s compare the pros, cons, and lifespan of different roof materials. 

BUR – Built-Up Roof Material

For ultimate protection against the elements, built-up roofing (BUR) is a favorite. Even though it offers maximum protection, the installation of fiberglass layers and hot tar makes applying a BUR roof a hot, messy, stinky process. Still, the unpleasant installation may less of an issue when one considers that this material of roofing can last 20-30 years at the cost of around $8,000 for a $2,000 square foot roof. Still, due to the nature of the installation and the material, a BUR roof isn’t recommended for homes with any significant slope. 

Asphalt Roll Roof

A popular choice, an asphalt roll roof is comprised of large rolled sections of a similar material that is used in asphalt roofing shingles. This material is installed in overlapping sections on rooftops of a predominantly flat pitch. Because of its relatively simple installation, this style of roof is popular among do-it-yourself homeowners or home flippers. For its ease of installation, it’s lifespan is another story — about 5-10 years depending on how it is treated. For a 2,000 square foot house, this equals roughly $4,500 every 5-10 years. 

Cement or Clay Tile Roof Materials

Extremely durable, cement or clay tile roofs are a favorite for their longevity — which can run over 100 years if properly maintained. They can be known to crack, but those tiles can be replaced. These roofing materials do require a significantly supportive home frame to function properly due to their weight. For the cost of installation for a 2,000 square foot home, prices could run upwards of $44,000. 

Compositive Asphalt Shingle Roof Material

Probably the most popular roofing material has to be composite asphalt shingle roofs. Even though professional installation for a 2,000 square foot home can run $11,000 or more, this only needs to be done every 15 to 40 years depending on weather conditions. Some of these roofs come with impressive warranties that also make them a lucrative buy. 

Wood Shingle Roofs

A wood shingle roof is precisely what it sounds like — a roof made of thinly sliced pieces of natural wood. While attractive, they require a great deal of craftsmanship to install. They have also been deemed such a unique fire hazard that they are not legal in some areas that are more prone to wildfires. These roofs last anywhere from 20-30 years, though some have been known to last 50 years if properly maintained. The cost for a 2,000 square foot home runs about $20,000. Thicker versions of these wood shingle roofs are also available that hold up better against the elements, but are more costly.

Metal Standing-Seam Roofs

As increased wildfires have threatened homes, metal roofs have grown in popularity in the last few years. These roofs are made from larger over-lapping metal panels — usually made of zinc, copper, steel, or aluminum. These roofs are virtually free of maintenance with proper installation short of periodically checking fasteners and seals. Because this roofing material is newly popular, its full lifespan isn’t fully realized. It is thought that it can last anywhere from 50-75 years — making it the last roof some homeowners will ever buy. The cost for one of these roofs averages about $22,000 for a steel panel roof on a 2,000 square foot house. 

Slate Roofing Material

Among the more durable roofs are those of quarried slate material. These tiles of molded clay or cement contain quarried slate and are carefully installed by specialists. This style of roof is among the most expensive to install, but its full lifespan is not yet known. There are buildings dating back hundreds of years that still have functional slate roofs. The cost of installing a slate roof on a 2,000 square foot home averages about $66,000. Nevertheless, this may be the last roof that structure may ever need even over multiple generations. 


There is a lot to consider when deciding on what roofing material to use for your home. For help making a decision, feel free to consult the custom home building specialists from Perry Hood Properties. 

Tell me more about building a custom home in Oklahoma with help from Perry Hood Properties. 

5 Signs Your Flip Buy is a Bust

(3-min read)

Buying a flipped home can be a fast lane to a turn-key home. However, because the quicker the flip, the larger the payout, some home flippers may cut corners that don’t show up in the pretty realty pictures. Here are a few telltales signs of a hastily flipped house. 

1. Sloppy Kitchen Remodeling (Where It Counts)

To completely remodel a kitchen takes more than fancy stainless steel appliances and the latest granite countertops. Many flippers attempt to save money in a large kitchen remodel by utilizing existing gas, plumbing, and electric connections, making for a disorderly layout. When looking into a flipped house with a remodeled kitchen, put the fancy surface-level upgrades out of your mind. The real indicators of craftsmanship will be evident once you start opening cabinets and looking under sinks. If it is a jumbled mess, it will likely be an expensive headache down the road. 

2. Botched Floor Remodeling

Problems in the flooring may not be easily detectable in realty photography. When checking out a flipped property, take a closer look in the doorjambs or wherever else the floor connects to something else — such as trim or molding. If you notice a lack of precision or just shotty work, this may be a canary in this coal mine. 

3. Unanswered HVAC, Roof, and Plumbing Questions

Immediately ask about the age of the HVAC system and the last time it was professionally inspected. All of the brushed chrome in the world won’t keep you cool if an old air conditioner fails in the middle of the summer. Also, inquire about the state of the roof. If it hasn’t been given any attention, this can be an immediate expense they were hoping you’d overlook. Do the same with the plumbing. If they really wanted to remodel the home thoroughly, there’s a good chance that the plumbing would require some attention. Because that is usually pretty expensive, they may hope that you’d deal it with once winter comes around.

4. Skimping On Electrical Upgrades

Before you “ooh” and “ah” about the crown molding, wood floors, or claw-foot tubs, you should first be looking at the fuse box. Many home flippers who aren’t licensed electricians will try to flex their DIY muscles where it is not advisable — the power in the house. If anything looks off about the electrical wiring in the house, it will likely result in costly repairs for you to enjoy.

5. Telltale Foundation Issue Clues

Shiny additions will never make up for foundation issues. Before you’re marveled by home theater system, begin your tour by opening and closing doors and windows. Any sticking or difficulties may be a sign of foundation issues. Because a granite island is cheaper than foundation work, many flippers will try to hide these pricy repairs behind impressive distractions. If anything seems off about the foundation, either run away or at least start asking questions. 


If you’d like all of the nicer amenities without the risk associated with dealing with home flippers, the Oklahoma-based home builders at Perry Hood Properties would love to help you build your dream home from the ground up. 

“Yes, I’d like to learn more about how easy it is to build my custom dream home in Oklahoma.”

3 Signs You’re Ready to Quit Renting and Buy a Home

(3-min read)

There are a lot of perks to renting. Most maintenance is taken care of, you can leave when you want (most of the time), and you’re not at risk of losing money in a fluctuating market. However, there comes a time in many people’s lives where buying a home ultimately makes more sense. Here are three signs that you’re ready to buy a home.

1. You Have Reliable Income

When you’re young, coming across a consistent income stream can be difficult. You may have bursts of good fortune and then have months of financial instability (this is especially true if you’re a freelancer). However, if you have reached a point in your career where your income is stable (even if it’s modest), you can start predicting your financial future. When you know that you will receive a paycheck ten years from now and what that paycheck may look like, paying more and more in rent hikes begins to make less sense. This may be a time when homeownership begins to make more sense. 

2. You’re Ready to Put Down Roots

Climbing the corporate ladder isn’t always straight up. Sometimes, climbing this ladder can take you from city to city in search of favorable opportunities. Once you have determined what city or town you want to live in for the next 10-30 years, buying a home in that place makes sense. If you’re still not sure if you’re going to remain in a select city, buying is a home is fairly risky. While you could potentially rent out a home you own elsewhere while you pursue a new opportunity, homeownership will tether you to a specific geographic location like few other obligations can. Make sure you dig the spot before you spring for homeownership. Selling a home, even more than buying one, is very expensive and challenging.

3. You Have a Decent Down Payment (or Can Acquire It)

If you don’t have a generous down payment ready to drop on a home, you will be paying for it and then some down the road. Not having at least a 20% down payment means you will also need to pay for mortgage insurance — insurance that protects mortgage companies from a loss if you can’t make the payments. These payments can add thousands of dollars a year to the cost of owning a home. In addition to mortgage insurance, you will likely be paying inflated interest rates in the place of a decent downpayment. So, before you even go to apply for a mortgage, it is a good idea to have a 20% of the price stowed away or at least qualify for a mortgage assistance program that can help you meet that 20% threshold. 


Instead of buying a house that somewhat needs your needs, have you ever considered a custom-built home that is guaranteed to? Working with the property experts from Perry Hood Properties, you can build your Oklahoma dream home in less time than you think. 

“Yes, I’d like to learn more about building a custom home in Oklahoma.”

5 Signs a Home is Going to be a Money Pit

(3-min read)

For most people, buying a home is the most significant investment of their life. This makes the buying process something not to be entered into lightly. Even though the scariest houses have been transformed into dream homes, you don’t want to end up trapped in a money pit. There are a handful of signs that the house you’re looking to buy is going to be a third-degree migraine. 

1. The Electric System is Outdated or Downright Scary

While the electrical infrastructure of a house can be upgraded, fixed, or totally replaced, it’s definitely not going to be cheap. When touring a house that you’re considering buying, pay close attention to fixtures and outlets. Are the electrical outlets grounded (two holes vs. three)? If they’re not, this is just a telltale sign that the rest of the house’s electric system is in near shambles. Ask to see the electrical service panel. If the sight of it makes you uncomfortable, this does not bode well for its future. 

2. Telltale Signs of Structure Issues

The wise man built his house upon the rock, but if the home you’re looking at is crumbing, your bank balance will be too by the time you fix the home’s foundation. Look around the outside of the house and especially the basement. Take special note of any cracks you find and their placement. Walking through the home, check to see how easily doors open and close. A door that sticks or doesn’t close completely is an indicator that the foundation likely has significant issues. 

3. Old or Substandard Plumbing

When looking at a house you’re considering buying, ask about the plumbing. When was the last time the pipes were changed? What are they made of? If the water is turned on, you may be able to conduct some tests of your own. Find the bathroom most distant from the water heater. Crank the bathtub water on thoroughly followed by the bathroom sink and then flush the toilet. Look to see if the bathtub water slows down. If so, you’re likely looking at needing new plumbing. 

4. Signs of Water Damage

While you’re in the basement or walking along the outside of the house inspecting the foundation, keep an eye out of signs of water damage. Warped materials, watermarks, and other signs of moisture may indicate water damage. This damage may be insignificant, but could also spell expensive mold removal. 

5. The Roof is in Rough Shape

Remember to inquire about the roof. If the roof looks rough, you may have more than just a new roof to pay for. A leaky roof can lead to water damage that may not be visible until it’s too late. 


If you don’t want to take your chances with a potential money pit, perhaps a new custom home build is what the doctor ordered. The home building professionals from Perry Hood Properties are excited to work with you to help you build the home of your dreams. 

Tell me more about building a new home with Perry Hood Properties.

4 Ways to Dampen Sound in Your Home

(2-min read)

Your home should be a place for peace and quiet. With that being said, sometimes quiet can be harder to maintain from room to room. Whether your kids like to crank their stereos to 11 or you don’t want to wake the baby sleeping during a dinner party, managing sound can be tricky. Let’s take a look at four simple techniques you can use to dampen sound within the home. 

Dampening Sound with Soft Elements

An uncluttered space can feel great, but sparsely-furnished rooms can end up being filled with echoes. To keep echoes to a minimum, consider incorporating softer elements into a room. Longer cloth drapes, throw pillows, and area rugs can absorb rogue sound waves without cluttering the space or breaking the bank. 

Ceiling-Mounted Acoustic Tiles

For as unsightly as it may be, popcorn ceiling insulation dramatically reduced sounds from bouncing around the room. For the same effect without the unsettling texture, acoustic ceiling tiles can help achieve the same desired dampening effect. Acoustic ceiling tiles aren’t costly, and you can usually install them yourself over the weekend. 

Seal Up Sound Leaks from Doors

One of the main culprits of sound leakage are gaps under and above doors — especially in spaces where wood or tiles floors exist. To cozy up the sound in a particular area, you can use weather stripping made of foam rubber under doors and along doorjambs. Most weather stripping can be found for relatively little cash in rolls at your local hardware store. This stripping comes with an adhesive strip on the back. Cut it to size, pull back the stripping, slap under your doors, and enjoy the quiet. 

Professional Acoustic Insulation

Just because you want to watch Transformers in surround sound doesn’t mean that the rest of your house wants to hear it. For those with home theatre systems, consider installing professional acoustic insulation. Designed for theater spaces and recording studios, this insulation comes in panels that can be strategically attached to the walls of wherever you want to kill excess noise in your home. 


Is your old home just naturally noisy? Maybe it’s time to upgrade. Enjoy the peace and quiet that comes with a newly constructed custom home from your friends at Perry Hood Properties. 

Tell me more about custom homes from Perry Hood Properties.

How to Easily Plot Your Furniture Layout (+3 Tool Recommendations)

(4-min read)

So, you’re moving into a new place. Congratulations! Whether you’ve purchased a new house or you’re renting a new home or apartment, there is a lot of planning to do. One task is determining your furniture layout. While you can do it the hard way — eyeballing it and moving things where you think they’ll make sense — you can save your back with these methods for designing the furniture layout of your new space. 

Method 1: Sketch Your Furniture Layout

This method is probably one of the most popular ways of designing your furniture layout. Why? Simplicity. For a rough idea of where to put things, all you need is a piece of paper and a pencil. If you want to be more exact, you’ll also need a tape measure. 

  • Start by measuring the rooms in your new home as well as your furniture. 
  • Sketch an outline of your floorplan. The easiest way to adjust for size is by making 1 foot = 1 inch.
  • Keeping the sizing in mind, very lightly sketch a bird’s-eye view of the furniture in places where you feel it may fit best. Keep the sketching light so you can erase to draw various placement ideas. 

Method 2: Use to-scale furniture cut-outs. 

Enjoy arts and crafts? Even if you’re not that crafty, this method of furniture layout is still within your grasp. All you’ll need is a few pieces of paper, a pencil, a tape measure, and some scissors. 

  • Like method 1, measure the floorplan of your new home to make a 1 foot = 1-inch rendering. 
  • On a separate sheet of paper, draw a bird’s eye view rendering of your furniture to scale. Write what each piece of furniture is and which room it belongs within for easy recollection — for instance, “Sofa, Living Room.” 
  • Once you have your above-view furniture drawn, cut them out of the piece of paper. 
  • Using the cut-out furniture pieces, lay them out on the floorplan. Move them into different places to determine which furniture layout design is best. Don’t forget to account for the direction doors will open. 
  • Use your phone camera to snap images of your favorite layout ideas — not just the one you like the most. These second and third choices will come in handy in case your ideal layout doesn’t end up being possible. 

Method 3: Use of mobile apps or computer programs. 

Many different applications allow you to forgo using paper and retain a digital version of your ideas. Most of these applications will even include various furniture choices that may closely resemble your items. Other applications may be able to provide a three-dimensional preview of how the room will look with the furniture in place. 

There are a handful of downsides to using computer programs and mobile applications. 

  • Cost: Many of these applications are free, but some with advanced features may cost a few dollars. 
  • Learning curve: While most of the apps are relatively intuitive, figuring out how to use them may take a few minutes. 
  • Not to scale: Even though the furniture options available in these applications vary, you will rarely find options that are precise to scale with your furniture. For smaller homes or apartments, this may become an issue when it comes to positioning your furniture following the layout you’ve designed in the application. 

Here are a few furniture layout design options to consider: 

Haverty’s 2D Room Planner
This web-based room designer tool is free and reasonably straight forward for use on a computer. 

PlanYourRoom.com
Just as the web address states, this no-frills room designer gives you the tools you need to design the furniture layout for your home. 

Magic Plan.
This mobile application available on iOS (iPhone/iPad) or Android allows those with minimal room-designing experience to design their room layout quickly. While the main app is free to use, it does contain in-app purchase options for additional features. 


Why settle for someone else’s floor plan when you can make your own?
If you’re tired of conforming to the layouts of others, perhaps a custom-made home is the right choice for you. 

“Yes, I’d like to speak with a Perry Hood Properties representative.” 

How to Transform a Bedroom into a Home Office

(4.5- min read)
Becoming an empty nester can be emotionally challenging. While you may enjoy the peace and quiet that comes with fewer people living in your house, it can be tempting to keep grown children’s bedrooms just as they left them. Wouldn’t it be nice to turn this space into a functional office? Today, we’re going to discuss how to transform a bedroom into a dedicated home office. 

Start from Scratch

Many make the mistake of merely throwing a desk in the corner of an existing bedroom and calling it an office. Keeping elements of a bedroom in your new office space will hamper your ability to think of the area as an office as long as it still feels like a cozy bedroom. To make the space as functional as possible, both functionally and mentally, start from scratch. Treat the space not what it is but rather what it could be. 

An excellent way to start fresh is to strip it bare. Completely empty the room of furniture, decorations, and anything that identifies what it once was. Consider painting the walls a color that inspires focus and productivity. Take measurements and build a floorplan to scale. When planning what furniture and other elements to bring into the space, only add items that will facilitate focused work. 

Dedicate the Space

One of the most challenging aspects of getting work done from home is getting into the proper mindset. While the prospect of working from home on the couch in your pajamas sounds nice, few remote workers do so. Blurring the lines of home and work be detrimental to focus. To combat this, dedicate the space to getting work done. Here are a few more tips for setting the area apart for work: 

  • Make sure the space has a door, possibly even one that locks. Consider adding a “do not disturb” door hanger to use when trying to maintain focus.
  • Only bring in items that inspire rather than tranquilize. Hang up your certifications, degrees, or achievements on the walls while keeping scented candles away.
  • Assign duties to your furniture. Have a chair that’s only for sitting in to do business. Keep home-like items off of your desk. Stock a bookshelf with books related to your industry. 
  • Keep TVs out of your office. You probably wouldn’t have a TV in your office at work. Don’t include them in your home office. 

Keep the Utilities in Mind

When setting up your home office, keep in mind the location of electrical outlets and HVAC vents. Keeping wiring around the room to a minimal will allow you to remain more focused. Noisey vents or papers being blown off of your desk will only distract you.

Plan for Home Noise

Because this office is within your home and not in a business park designed for work, keep residential noises in mind. It may not be a bad idea to look into some sound-dampening if your office is near a noisier living room or entertainment room. If there’s no way around noise, consider installing a stereo system in your office or invest in noise-canceling headphones. 

Consider Your Light Sources

If you like to work in the sunlight, consider positioning your desk or other workspaces near a window. If this isn’t possible, consider installing a light fixture above your desk that will do the trick. Being able to tweak the lighting to your liking is just one of the many perks of a home office. 

Keep Additional Furniture Multifunctional

If your office needs to double as guest quarters from time to time, make sure to keep the guest-related furniture multifunctional. Determine what percentage of time the space will be used for what purpose and plan the layout of the room accordingly. No sense in keeping a king-sized bed in a room will only be used five days a year. Consider using Murphy beds or sofa beds that can fold out at a moment’s notice rather than a permanent bed. 

Warn Your Kids

You may be gung-ho to turn your grown child’s bedroom into your personal business center, and that’s your prerogative, but keep them updated on your intent and the progress. It can be somewhat jarring for a child in college to come home for a visit only to find their childhood bedroom wholly transformed into your command center.


Not enough room for a home office? Perhaps it’s time for a new space.

If a new home makes the most sense for your current life situation, the home building experts from Perry Hood Properties would love to help. 

Schedule an appointment with a Perry Hood Properties home builder today.


Deprecated: Function get_magic_quotes_gpc() is deprecated in /home/perryhoodproperties/public_html/blog/wp-includes/formatting.php on line 4387